3 Commonly Used Methods to Test Electric Fences
- Share
- Issue Time
- Jan 4,2022
Summary
In this article, HPS Fence has compiled the commonly used methods for testing electric fences, hoping to provide you with some reference opinions.

After you've properly installed an electric fence, regular testing of the fence wires is an important maintenance task. HPS Fence has compiled the following common methods for testing electric fences.
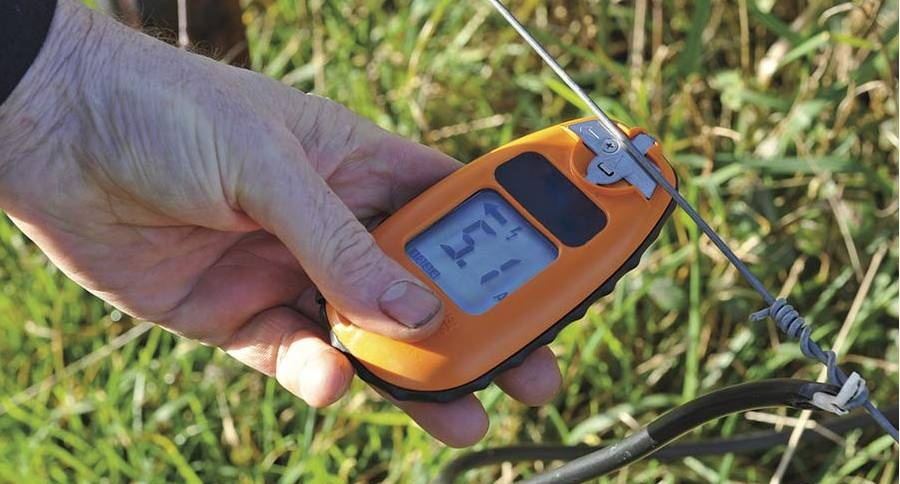
Testing voltage with an electric fence voltmeter
(1) Use an electric fence voltmeter for the job
This tool is specifically designed to detect voltage in electric fences, which makes it the easiest and most reliable tool to use for the job.
Most models include a handheld meter with a digital readout and a metal prong on the top and an attached metal probe at the end of a wire.
(2) Move to the section of fence furthest from the charger
The charger (usually a small box) provides the electricity to the fence. By checking the voltage at the furthest point from it, you can be confident that the proper voltage is coursing through the fence.
Refer to the owner's manual or signage on the charger to determine the correct voltage range for your fence. Depending on the type of animals they are meant to control, electric fence voltages typically range from 2,000 to 10,000 volts.
(3) Touch the meter's probe to the ground wire, if there is one
If the fence has 2 or more wires, one of them is probably a ground wire. Use your owner's manual to identify it. If you're not sure, or if there is no ground wire on your type of fence, skip this step and move on to the step that describes sticking the probe into the ground.
Keep your hand on the plastic or rubber section of the probe, not the metal tip. Otherwise, your body (instead of the meter) will test the electric fence when you touch the other probe end to it!
Some types of fencing ground directly into the earth instead of using a ground wire.
If necessary, contact the fence manufacturer or an electrician so you can identify the ground wire properly in the future. It's also good to have an expert make sure your ground wire is connected properly, as poor grounding is a major cause of electric fence malfunctions.
(4) Stick the meter's probe into the soil if there isn't a ground wire
If your fence model doesn't use a ground wire, just stick the metal end of the probe several inches/centimeters deep into the soil. You can also do this if you're not sure which wire on the fence is the ground wire.
Stick as much of the metal tip of the probe into the ground as you can. Make sure you're not touching the metal tip with your fingers when you do the test.
All single-wire fences ground directly into the soil, but some multi-wire fences also lack a grounding wire.
(5) Touch the prong on the tester to each charged wire
With the probe still touching the ground wire or stuck in the soil, touch the metal prong on the tester to one of the charged wires. The digital readout should give you a voltage reading. Compare this reading to the recommended voltage for your fence model.
Repeat the test on each fencing wire.
The readouts are often in thousands, in which case a reading of 5.0 indicates 5000 volts.
If the reading is above or below the recommended range for your fence, there is a problem with it and it should be serviced.
If you don't get any reading, make sure you turned the voltmeter on! If the meter is on, that means the fence has no charge.
(6) Repeat the test every 100 ft (30 m) closer to the charger
If you get a low voltage result, repeating the test closer to the charger may help you pinpoint where there is a problem. And, even if the voltage reading is good on your first test, repeating the test in other locations will confirm the result.
Just walk along the fence and, every 100 ft (30 m) or so, quickly repeat the test again.
Using a non-contact voltmeter
(1) Purchase a non-contact voltmeter
Non-contact voltmeters look a bit like extra-thick pencils with flat sides. They have a translucent tip that usually blinks when the meter is on and stays lit when voltage is detected nearby. The meter typically also beeps when voltage is detected.
As the name indicates, you don't need to touch a wire to check for voltage with this product. This makes them a safe and very useful tool for a variety of purposes.
(2) Turn the voltmeter on and check for a blinking light at the tip
Make sure there's a battery installed and push the button to turn the meter on. You'll see a blinking light (often red) at the tip of the meter.
Non-contact voltmeters are very simple tools, but you should always read the product instructions before using one for the first time.
(3) Point the meter at the fence when you're within 5 ft (1.5 m) of it
As soon as you get within a body length of an operating electric fence, the meter will probably start beeping and have a steady light at the tip. If not, move steadily closer to the fence, but don't make contact with it.
If you get within a few inches/centimeters of the fence wire(s) and the meter still doesn't light up and beep, you can be confident that there isn't voltage in the area.
Keep in mind that non-contact voltmeters don't give you any information about the amount of voltage, they only reveal if there is or isn't any voltage coursing through the fence. Use an electric fence voltmeter if you want specific voltage readings.
(4) Test the entire length of the fence to check for problems
Whether your initial test indicates that the fence is “On” or “Off,” it's wise to check all along the fence to confirm your results. Walk the length of the fence while remaining within about 3–5 ft (0.91–1.52 m) of it. Either point the meter at it constantly, or at intervals of around 50–100 feet (15-30 m).
If you get the "on" indicator (lights and beeping) in some sections of the fence and "off" in other sections, follow up with an electric fence voltmeter (if you have one) to see if you get variable voltage readings along the fence. If you do get variable readings, or if you don't have an electric fence voltmeter, call an electrician or electric fence installer.
Trying alternative methods
(1) Attach electric fence indicator lights to any fencing you install
Indicator lights are small devices that you can easily attach to your electric fence at regular intervals. Whenever the fence is on, the indicator light will remain illuminated.
Hook up the indicator lights according to the product instructions. Contact an electrician or electric fence installer if you need assistance.
You should also buy and install clear warning signs (available at electric fence retailers) at regular intervals.
(2) Hold a compass near the fence to check for an electromagnetic field
Move the compass to within about 2–3 in (5.1–7.6 cm) of each wire on the fence. If the wire is charged, the magnetic field created by the charge should cause the compass arrow to vibrate.
For the best results, hold the compass near each wire for 10-30 seconds. Most electric fence chargers send pulses in 10-30 second increments, and these will have a more noticeable effect on your compass.
(3) Touch a plastic-handled screwdriver to the fence if you don't mind sparks
Choose a metal screwdriver with a thick plastic handle. Make sure you don't touch any part of the metal with your hand. Touch the screwdriver to each wire on the fence and watch for an electric arc that will leap from the wire to the screwdriver.
If you don't notice any arcing immediately, run the screwdriver back and forth over the wire for 10-30 seconds. If there's still no arcing, the wire most likely has no charge.
Avoid touching the fence! If you touch a working electric fence, you'll feel a painful zap on your hand and possibly part of the way up your arm. This is dangerous and should be avoided.
Never grasp the wire with your hand. Clenching of the hands is one of the body's natural reflexes during an electric shock, and if this happens you may not be able to let go of the fence. This could lead to serious burns or other injuries.
For the best results, use a dedicated electric fence voltmeter for the job. If you just need to confirm whether a fence is on or off, use a non-contact voltmeter. Only use other methods—like a compass, never underestimate the shock power of an electric fence!
As a professional supplier of security protection solutions for small farms and home courtyards, we always put the needs of our customers first. We continue to develop new features and products, and also provide a complete quality warranty for the products. At the same time, we can also provide corresponding customized services according to customer needs. If you are interested in our electric fence, please contact us immediately!